![]()
Performance Numbers
It’s important to remember that the XPR, at the end of the day, is simply still just a Beechjet. Although you’ll notice significantly better performance than a stock airframe, the basic rules and SOPs of normal Beechjet flying are still in play. For example, on rotation, it remains “gear up, lights in, yaw damp on.” On approach, the flap and gear sequence remains “flaps 10, flaps 20, gear down and flaps 30, landing checklist.” I’m not going to waste time here focusing on these similar items, and instead focus on areas of flight that are different, including certain items of technique that seem to maximize the performance of the aircraft.
The most important thing to keep in mind with the XPR is that although you are flying an aircraft that has substantial modifications that obviously will increase the performance of the aircraft, the book numbers for the aircraft DO NOT CHANGE! Your takeoff speeds and distance numbers remain the same, the climb gradients remain the same, cruise speed and fuel burn are the same and the landing distances remain the same. We need to adhere to the original book numbers when calculating performance and doing preflight planning. Will you see performance far in excess of what the book says? Absolutely. We cannot do any planning for this excess performance, however.
You might ask: how did they get away with this? Well, easy. With the larger engines and reduced idle thrust on the ground, we know that our performance will always exceed that in the book. If we know our performance will exceed the book and don’t change anything in the book, we’ll always outperform the book resulting in an additional margin of safety.
I have our XPR all loaded into Foreflight and we utilize them for our weight and balance and performance calculations. Foreflight already has the 400A/XP profile and performance numbers loaded into it. I view it as imperative to get this or another electronic system to calculate performance. There are just too many spaghetti charts to work through for the variety of conditions we fly airplanes in to do it for multiple flights a day manually. If you do try to do this, it means you’re probably just going to start getting lazy and skip looking at certain performance parameters. Furthermore, using Foreflight allows us to run multiple simulations using a variety of potential conditions to get an idea about how your aircraft will perform when the time comes.
Brakes and Stopping (Performance Issues)
If you remember from the engine section of this article, the XPR does not come equipped with thrust reversers. This isn’t really a problem. For landing performance, manufacturers don’t normally get to take any credit for reversers, so the numbers remain the same. This means there is really no disadvantage to the XPR as it compares to a normal Beechjet besides perhaps burning through brakes faster than normal. To minimize brake and tire wear and minimize operating cost (Beechjet brakes are not particularly expensive as compared to other jets, but they’re still not cheap), you’re probably best served picking a longer runway to land on when possible (i.e. – parallel runways where one is longer than another).
You should keep your brake energy limitations in mind. Your performance software will track this for certain performance calculations, but your turnaround times need to be kept in the back of your brain and you should reference the chart when needed. Without any reversers, you’re going to work the brakes harder and build up more heat. Practically speaking, the brake energy charts and limitations already assume max braking, so it shouldn’t be any more of a limit than before, but keep it in mind that you’re working the brakes harder. The XPR brakes are the same as normal Beechjet brakes, so don’t expect anything other than what a normal Beechjet would give you.
For takeoff on wet or contaminated runways, however, manufacturers can take advantage of reversers when calculating runway distance for aborted takeoffs (FAR 25.109(f)). You do remember the Beechjet is certified under Part 25, right!?
When I do wet/contaminated runway calculations, I need to ensure that I select the thrust reversers to inoperative when running my numbers to ensure that I’m not getting credit for performance that I don’t have.
Along these lines, it is imperative that you run takeoff and landing runway numbers in the XPR. Furthermore, you should incorporate a little fudge in the distances calculated to ensure what you calculate is practically feasible. Remember, your only tools to slow down are your brakes and your speedbrakes. If you want to count aerodynamic brake, fine, but it isn’t going to do much in getting you stopped on a 4500’ runway!
Beechjet brakes are touchy at best. They take quite a bit of technique to operate smoothly. When operating in the winter on contaminated runways and taxiways, it doesn’t take much to overcome the limitations of smoothly operating the brakes or to kick the anti-skid on. Remember that to obtain the best braking performance on contaminated runways, we need to apply the brakes and hold them. Let the anti-skid do its job to slow down as best as the aircraft can.
One final consideration as it relates to braking and stopping is that the FJ44 engines have full FADEC that incorporates ground idle and flight idle logic. When the squat switch triggers the weight-on-wheels signal, the idle speed on the Williams drops and removes significant residual thrust. This is a drastic improvement versus the JT15, which had no such provision. This does help reduce the requirement to use brakes, both on landing and while taxiing. You’ll find there is no need to drag the brakes taxiing and you might need a little additional breakaway thrust when starting from a standstill.
On The Ground
The XPR can live without a GPU. It’ll start, but you can tell it doesn’t like it. The Williams engines are bigger than the old JT-15. Combined with the Garmin, which also puts additional strain on the battery, startups take a toll. Get a GPU if its available and use it. It is money well spent. Get it connected and get your avionics all setup.
We'll address checklists at the end of this article, but your taxi checks are simplified in the XPR. There are no EFCs anymore, so there's no EFC check to be done. Nice when operating on contaminated taxiways. There's also no thrust reversers to check. One less thing to worry about.
Takeoff
As mentioned before, our numbers remain limited by those published for a normal Beechjet. Textron never issued revised performance numbers that we can use for flight planning purposes. Your performance software should give you the numbers you need, including the runway required. Tab data might be fine, assuming you meet the 5 requirements listed in the checklist. Always include some margin for error on the runway required so you’re not skidding to a stop on a short runway after an aborted takeoff hoping that you’re getting the performance the book says you should be getting.
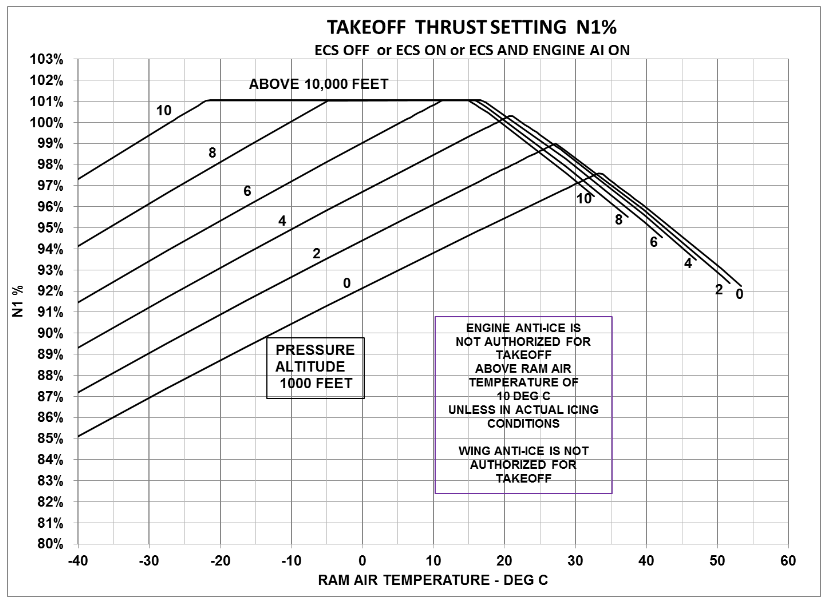
Your performance software (or tab data) will probably also provide you with an engine power target. This is the JT15 number and will do you no good with the FJ44. The AFM supplement for the new engines has spaghetti charts to calculate your target power for the day, but the FADEC will automatically calculate and display it in the aircraft when power and avionics are on. You should verify this calculated value matches closely with your preflight planning.
With the full FADEC controls, your throttles are simply a thrust lever angle that is sensed and sent to the FADEC. In theory, at the beginning of takeoff, you can stuff the throttles all the way forward to the takeoff detent quickly and let the FADEC handle the engine acceleration. I prefer to treat it like a normal engine, however, and slowly bring the engines to takeoff power. This allows me to monitor the acceleration and reduces any thrust asymmetry. Either way, all you need to do is put the throttles into the takeoff detent and check that the engine N1 speed matches the target calculated by the FADEC. No need to twiddle with the throttles to set the power. I think you’ll be quite happy with the rate of acceleration and initial climb.
A silver lining with the lack of thrust reversers on the Williams used on the XPR means that you no longer have to worry about inadvertent thrust reverser deployment and don’t need to brief that anymore. In the place of the Emer Stow buttons are the FADEC reset buttons. I view this as quite a safety improvement. If you have ever done a deployment on takeoff in the sim, it’s unpleasant. If you’re not quick on the Emer Stow buttons, it’s almost impossible to control. Good riddance.
Climb
Once you’re off the ground and through flap retraction height, all you need to do with the power is click the throttles back to the MCT detent. Your G5000 will display MCT when you’re in the detent. The FJ44 FADEC will now give you the best continual thrust for climb. Much less work than the JT15 rigmarole of setting power based on preflight calculations or using the 600 degree ITT rule.
If your departure is taking you through icing conditions and you need to turn on wing anti-/de-ice after takeoff, you are no longer required to pull the power back below 90% N1 to turn them on. Go ahead and just turn them on and enjoy one less thing to do during a high-workload phase of flight.
Don’t forget your speed limits, and be sure to comply with your clearance if flying IFR. If given a low altitude initial level-off, you will find that the initial climb rate of the XPR will quickly cause you to blow through the altitude (looking at you, RUUDY). There are little notches in the thrust lever between the cruise, climb and TO detent. Although convenient to help know where your power levers are, if you’re in need of quickly pulling power back to prevent busting altitude or speed restrictions, you’ll need to pull a little harder on the throttles to overcome the detent resistance. You’ll probably then pull the power too far back because there are no detents once you’re below the cruise detent and all that extra pulling force has to go somewhere.
The Garmin G5000 has a really good flight level change (FLC) functionality. Whereas the older Proline autopilot FLC function would usually start porpoising, the Garmin system is pretty spot on the money. So, use it.
The book gives us two climb profiles, 250knot/mach .64 and 220knot/mach .64. This, again, is the same as the normal Beechjet. I have seen some operators and pilots who like to climb the Beechjet right at redline speed. This might reduce the climb rate, but it prevents you from getting too slow in the climb and ending up on the backside of the thrust curve and never getting up to full cruise speed. With the XPR, this isn’t really a concern. Keep to the climb profile options in the book.
I recommend the use of the 220 knot profile. Why? Because this is the primary way that the XPR will save you on fuel. Not only is the thrust specific fuel consumption of the FJ44 significantly better than the older JT15, the flat-rated engine will easily get you up to your cruise altitude faster. This will allow you to accelerate to cruise speed and pull the power back to cruise power quicker, where you’ll see truly low burn numbers. By using the 220 knot profile, you spend less time at the lower altitudes and get cruising quicker. Quicker climb = Quicker to cruise power = quicker to fuel savings.
If you file for the 40s, which is what you’ll normally do, figure on only taking about 15-18 minutes to climb to cruise altitude if not held back by ATC. When climbing, keep in mind the AIM recommendation in 4-4-10(d). In FLC on an ISA day, you will see climb rates up to 9,000ft./min. Use common sense if this is appropriate or not. If it’s a busy area with lots of traffic, pull the power back and reduce your climb rate to avoid nuisance TCAS alerts with other aircraft. Once you are within 1000ft. of your assigned altitude, you need to reduce the rate of climb to below 1500ft./min. You may need to reduce even more to avoid potentially setting off TCAS alerts. The Garmin will not automatically do this. You have to. If you leave the Garmin in FLC and let it automatically transfer to ALT Capture, you’ll find that the Garmin will have no problem capturing the altitude, but it will certainly give you max climb performance to the last possible second before capturing.
When flying a normal Beechjet, anything above 41k ft. is rarely used. The JT-15s just don’t have the juice to really get you that altitude. When you have an XPR, everything to 45 is fair game. However, a word of advice for these high altitudes: let the trunk burn down to about 200-300lbs. remaining before using anything above 41k ft. The lower weight helps the aircraft quickly climb and settle into the higher altitudes and feels more comfortable when sitting on the wing that high.
If you get an intermediate level off during a climb (especially in the upper 30s and lower 40s) and are allowed to accelerate, be careful when resuming your climb. You’ll probably select VS to re-initiate the climb. Slowly roll in the VS increase. You have a lot more power in the XPR at altitude, so if you scroll the knob too quickly the aircraft will pitch up far too quickly and start to impose G-load on the airframe. If you’re at high altitude and near Mm0, this sudden and rapid G-force increase can easily cause momentary shockwave formations that will result in buffeting on the tail of the aircraft. Be smooth with all this power you now have.
I do recommend keeping an eye on the AOA gauge. Anything above .3 on the gauge will mean you’re sitting pretty far back on the wing. Although the XPR can easily pull you back “onto plane” once you hit your cruise altitude, it will take longer and is a loss of efficiency. If you follow the guidance given in this section, you should stay comfortably above this and get nice quick accelerations once you get to altitude.
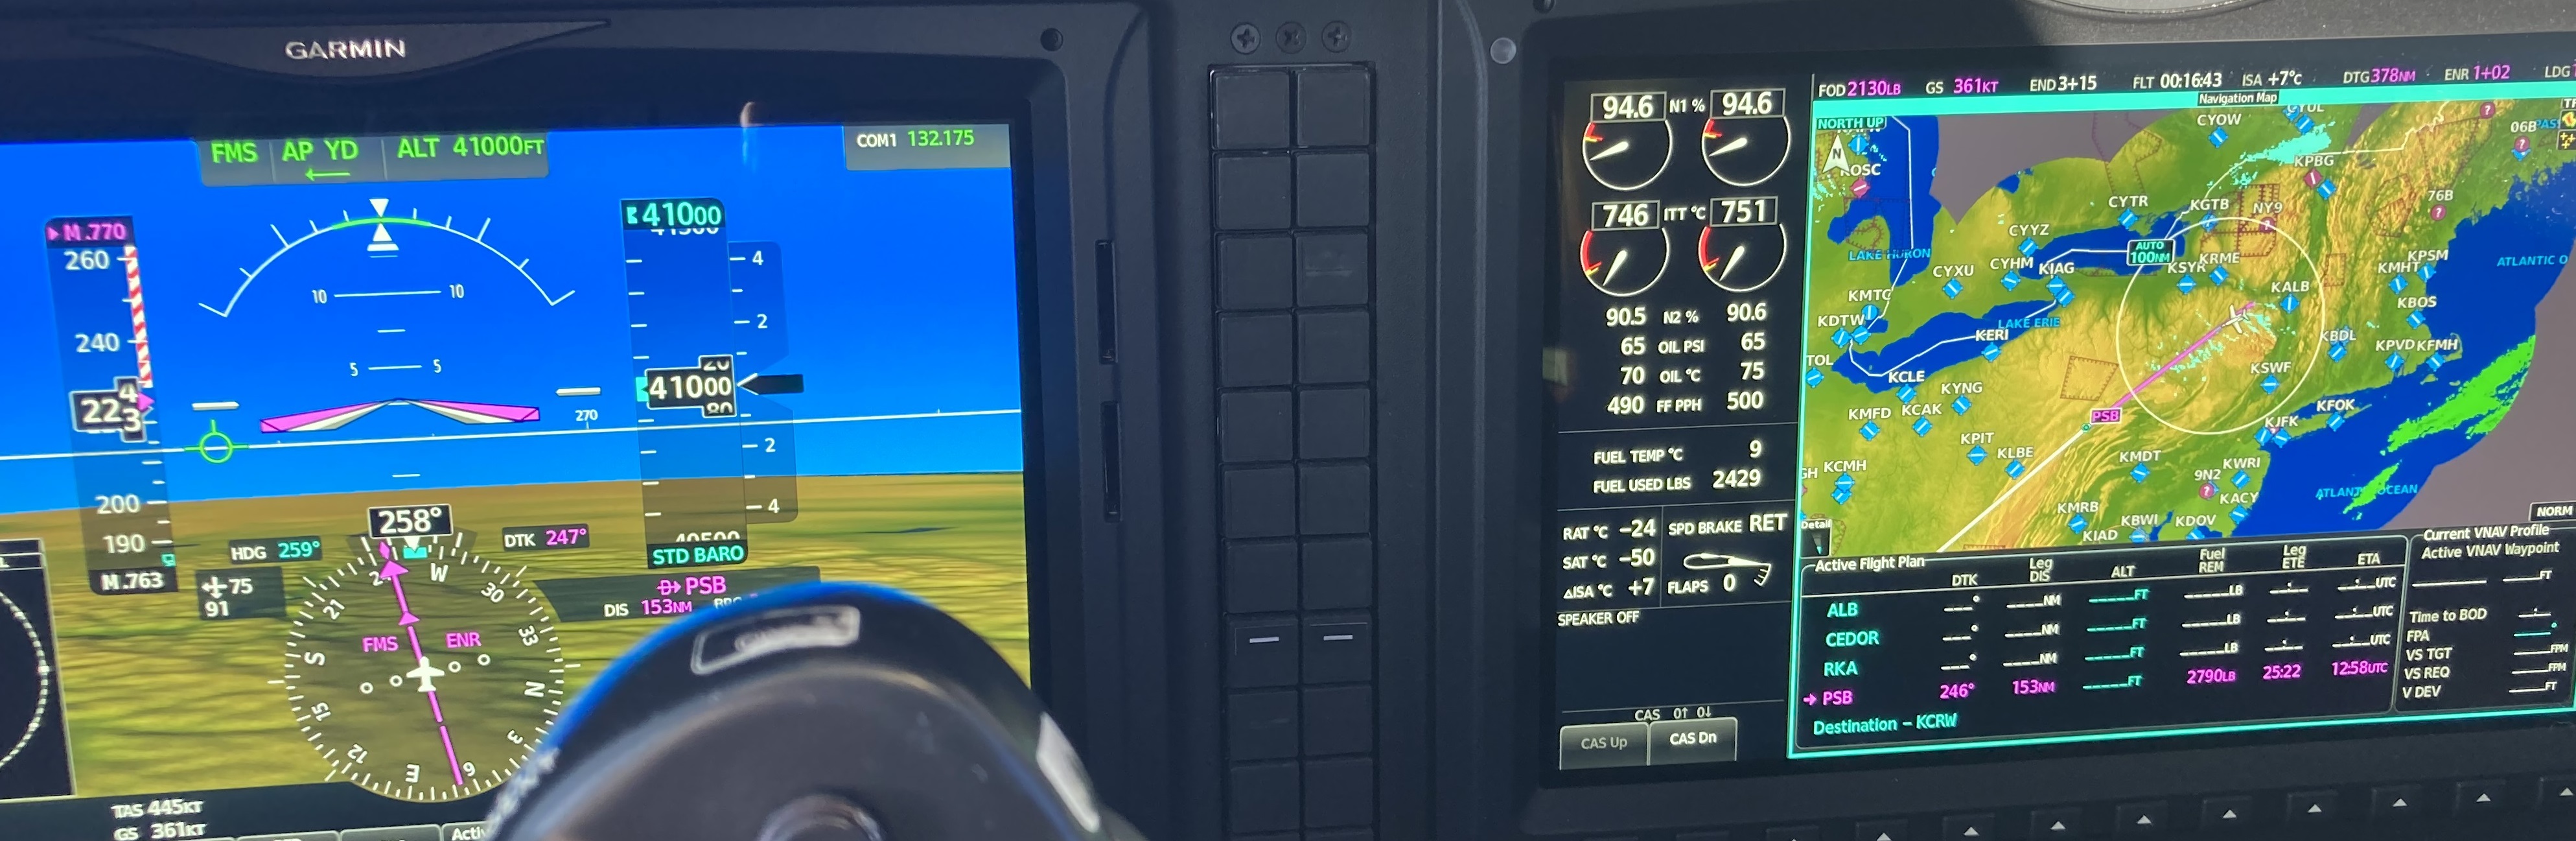
Leveled off and accelerated in 16 minutes at ISA+7 at FL410! About 20 minutes less time than a normal Beechjet.
Before moving on to the cruise section, I want to show the savings of the XPR's climb rate. From above, it took approximately 20 minutes less to climb to altitude. During cruise, our speed is about 440 knots TAS, whereas its climb speed (mach .64) is much lower, about 370 knots TAS. Over 20 minutes, that represents about 25 miles of distance between the two airplanes! Quite the difference!
Cruising
The FJ44 seems to exhibit better fuel burn numbers at the higher altitudes. It is most efficient in the low to mid-40s. It isn’t quite as efficient in the 30s. I normally file for 40k or 41k ft. At this altitude, I set my fuel burn adjustment on Foreflight to -18% from a normal JT-15 profile and it’s pretty spot-on. When I do shorter flights that don’t justify the higher altitude selection and I file in the 30k range, I usually need to dial the adjustment to only -12% to -15%. Still an improvement but not the best burn we can get.
Otherwise, there isn’t much more to say about cruising in the XPR. Monitor your fuel burns and fuel levels. Once you have burned some fuel off, you can climb above 41k if you want to. Usually you’ll step up to 43k and then step up to 45k.
You’ll see some great fuel burns in the 40s that are significantly lower than a normal aircraft (about 100-200lbs. per hour per side). This is icing on the cake. You have saved 20-30 minutes climbing and now get to save more in cruise. The XPR’s extra power is the gift that keeps on giving. He's a photo taken in cruise at ISA and 40k feet. This gives you a pretty good idea of what to expect.
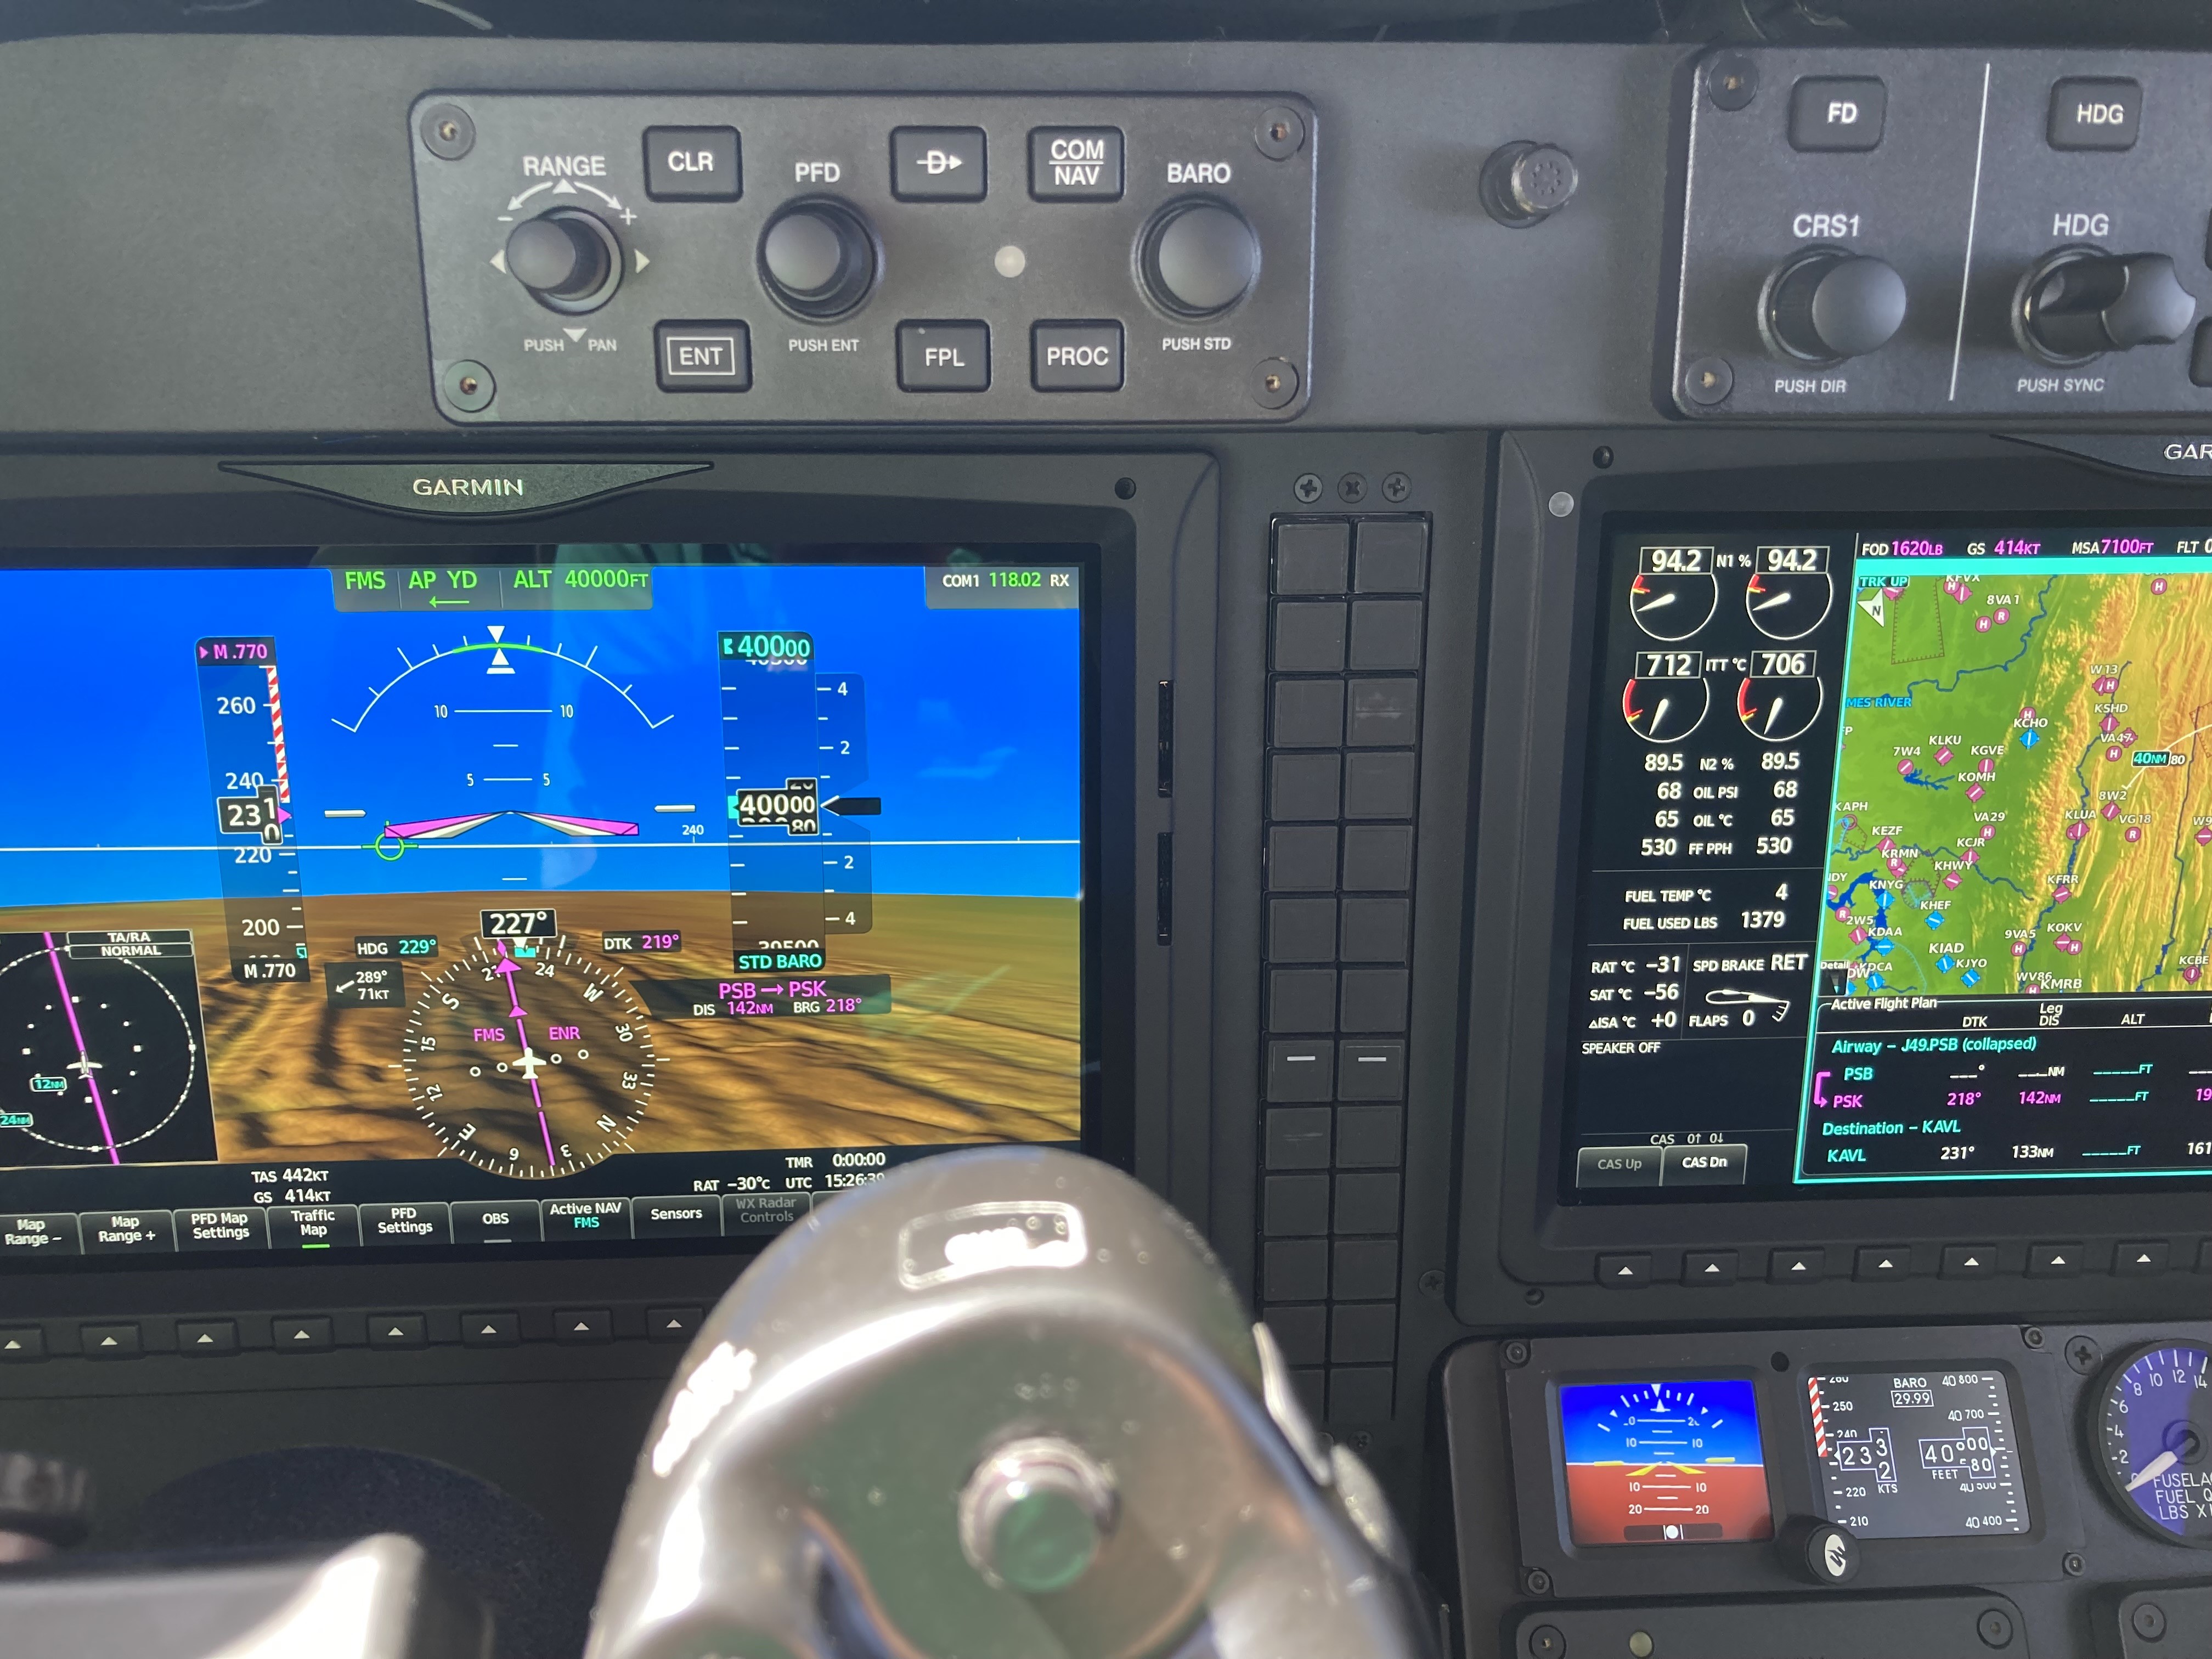
1,060lbs. of fuel per hour at FL400 and mach .77. About 10% lower fuel burn than the JT-15 book numbers. If we go higher, we'll get even more fuel burn advantage.
If you're cruising at FL430 or above, you need to keep your mach buffet boundary limitations in mind. Practically speaking, your max mach number at FL450 is about .76, not .78. You'll notice occasional buzz and soft wing drops if you cruise too fast at these high altitudes.Descent
There is no special considerations for descending the XPR. It’s a normal Beechjet.
The one consideration that is different is that there is no need to run the engine heat before pulling the power back for the descent. That’s a JT-15 thing. The Williams doesn’t suffer from the reputation of flaming out. Still, don’t take this for granted. Be smooth on your power change during descent. No need to slam the throttles back and test the FADECs ability to manage engine deceleration.
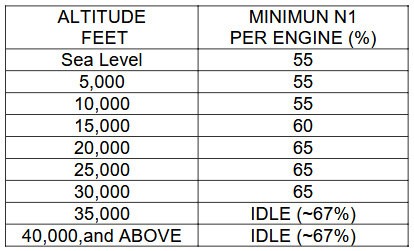
While on the topic of anti-/de-ice equipment during descent, you do need to keep in mind that Williams wants you to maintain certain power settings to avoid having too little bleed air to effectivly run the wing and engine heats. They provide a chart that makes it easy to figure out the minimum N1 required. I find that sometimes I'll have to put some speedbrakes out so I can carry a little bit of engine power in on descent to ensure that I have enough heat. If your XPR is a modification of a later RK- serial number, you'll have the wiing heat light on the brow. This can be an indication that you're producing enough bleed to keep the ice away.
Keep in mind that altitude is the secret weapon of the XPR. Your efficiency gains are predicated on getting high quickly and staying high. If ATC brings you down early, you need to take into account that you’ll burn more fuel than you were initially planning on. The G5000 or Proline both have very good descent planning tools, and the mental math rule of thumbs also work well. Either way, try to stay high as long as practical to maximize efficiency gains.
Approach
There are also not many additional concerns related to the XPR vs a normal Beechjet on approach. There are a few things to consider, however.
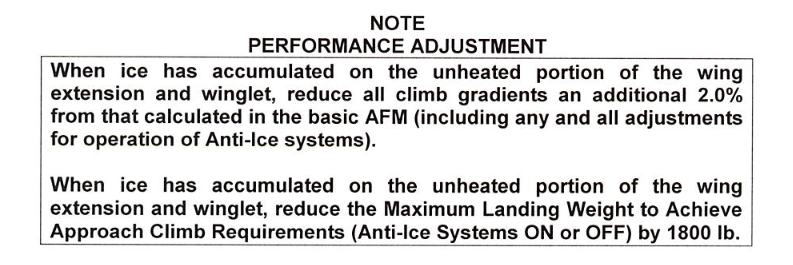
Remember from the system discussion about winglet deicing? This now comes back to us. The winglet leading edge might look like the rest of the wing’s leading edge, but it does not have any ice melting capability. If you fly through ice, your winglet will accumulate ice. This means that if you build up ice on the aircraft, you will need to factor in a decrement to the maximum landing weight account for the loss of performance, see the AFM performance adjustment, below.
Although this has never been a particularly big issue in practice (you’re already pretty light when you normally come into land), it could be a bigger issue if flying in the mountains or if you’re landing a heavy weight (possibly a return caused by a problem).
Your approach speeds (Vref and Vapp) remain the same as a normal Beechjet. If you have a G5000, the green dot provides data on 1.3Vs1, which provides a good rough estimate as to what ref plus a few should be. Your landing speeds should match with the green dot calculated by the Garmin. If they’re not aligned, you should figure out why. I’m betting it’s because you are at flap 20 and not 30. Either way, you should figure out the reason for the discrepancy, because getting slow with unknown speeds isn’t a good idea. Your AOA gauge is also useful. I find that you’ll be around .45 on the AOA during approach, but this is subject to change depending what kind of performance you’re trying to accomplish.
Landing
The Beechjet is not known for being the easiest airplane to get greased landings in. The short stubby landing gear just doesn’t do much to help the pilot. On the other side of the coin, the landing gear on the Beechjet can take quite a beating. The XPR does nothing to help you on getting smooth landings. Sorry.
Keep in mind that the winglets play a factor during the landing. If you’re not careful and approach too quickly, the winglets add a lot of efficiency of the wing in ground effect. Add to this you don’t get ground idle out of the engines until you get the wheels on the ground. Combined, these items make the XPR a float machine if your speed and flare are not managed properly.
Because of this, it is critical that you follow the SOP guidance on how to fly an approach. Calculate your ref speed, and fly the approach at ref+10. You then decelerate to ref over the fence and hit that thousand foot marker. Don’t let it float and don’t eat up runway. Nothing is more worthless than runway behind you!
Once on the ground, get those speedbrakes up ASAP. Remember, you have no thrust reversers, so you only have the speedbrakes and wheel brakes to get slowed down. Don’t waste runway. The speedbrakes are most effective at high speed and do two things for us:
1. Add drag to increase the aerodynamic braking; and,
2. Reduce lift to put more weight on the wheels and increase the wheel brake’s ability to do their job.
Contaminated runways should be handled with care. As stated before, do your performance homework ahead of time. The Beechjet comes with a wealth of numbers for a variety of runway contaminant conditions. Don’t ignore them and don’t get lazy. Make sure you can get down and stopped on the runway you’ll have and build in a little margin to ensure you’re not panic stopping. If the antiskid activates, hold the brakes. The antiskid will give you all the braking you’ll get.
Other Important Items
Checklists. The normal Beechjet checklist doesn’t work for the XPR for a lot of items, especially startup and taxi checks. There are just too many differences for it to be an effective checklist. The AFM supplements for the STCs that comprise the XPR conversion include all the modifications required for the normal, abnormal and emergency checklists. I recommend that you develop a new normal checklist that incorporates all the changes for the XPR. This increases the effectiveness of the checklist compared to one that is tailored for a normal Beechjet. However, use caution. Double and triple check that your new checklist only removes and adds things that it needs to. You don’t want to remove something that should remain or forget to include something new that’s in the supplement.
----
Home -- Aircraft Sales -- Contact Us